

Dress up your holiday!
Skill level: Easy!
Supplies:- (2) ¼ yd. or more fabrics of choice, 1 for back, 1 for top (if you want the letters to be reversible, think about this!)
- Lofty acrylic batting/wadding
- Temporary Spray Adhesive (I used Sulky KK2000)
- Glad Press’n Seal
- Sharp Pinking or other fancy edge scissors or rotary cutter
- Paper cutting scissors or craft razor blade
- Paper
- Pencil
- Marking Pen (to mark on Glad Press’n Seal)
- Utility thread
- Decorative thread in top & bobbin
- Other decorative items of your choice: ribbon, candy canes (real or fake), ornaments, tinsel, etc.
- Something by which to hang the letters, eg, O-ring, fabric, craft board, etc.
Making the stencils:
- . Draw your letters to make stencils—I did mine freehand (the 'H' measures about 4"x5"; the 'O' measures about 3"x3"). You could also use the computer for choosing fonts: select a font that will give you a block style from which to make a stencil and print. Cut out with craft scissors or razor blade. (If you’re really confident, skip this step and go to step 2 directly.)

2. Place your cut-outs (or do your freehand) on a piece of cardboard or template plastic. Draw around the stencil with a pencil or pen. Cut out with craft scissors or razor blade.

- If you’ll be using the adhesive spray product, I recommend that you do it in the lid of a cardboard box, or take it outside so that any overspray will not affect other surfaces or cause problems with fumes. I used a box lid.
- On your chosen surface, place and smooth out the
backing fabric wrong-side up. Spritz
with adhesive quickly across the fabric or in bursts—not necessary to use much,
so watch your trigger finger.
 Place and smooth out the batting/wadding on top
of sprayed wrong-side of backing
fabric. (I used a raggy scrap of batting.)
Place and smooth out the batting/wadding on top
of sprayed wrong-side of backing
fabric. (I used a raggy scrap of batting.) Place top fabric wrong-side up on top of the batting, smooth out and spritz. Turn
over and place on top of batting. Take out of box, or return inside and smooth
out.
Place top fabric wrong-side up on top of the batting, smooth out and spritz. Turn
over and place on top of batting. Take out of box, or return inside and smooth
out.- Pull out a small sheet of Glad Press’n Seal that will cover the fabric surface that you will be stenciling. Note that the Glad Press’n Seal is bumpy and sticky on one side (easy-to-remove sticky). Place this on the surface of the fabric and smooth out with your hands.

Product placement?? (LOL)

- Place your stencils on top of the “fabric sandwich”
you just created. Leave at least ½” or more between letters as you will be leaving
a ragged but decorative edge when you cut them out. (Stencils should be on top
of the Glad Press’n Seal.) Using a
marker, draw around your letters. Don’t be too fussy. They’re supposed to
looked folksy or homemade.

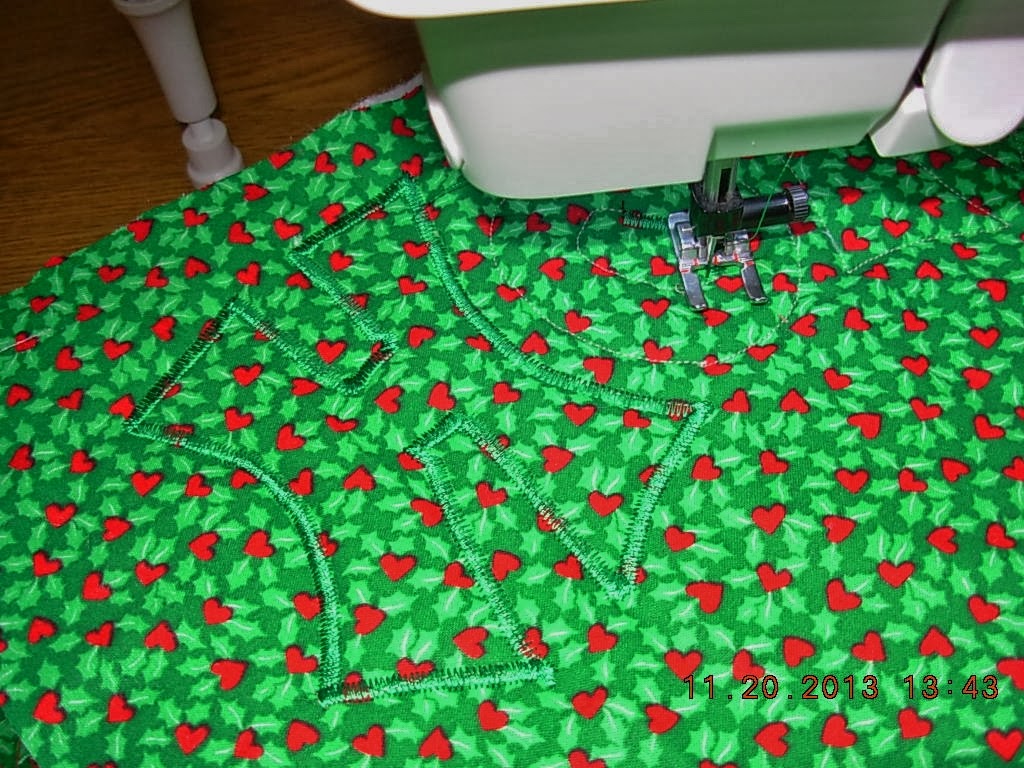
Tracing the letters onto plastic wrap. - Set your straight stitch length to about “2” for closer stitches (makes the Glad Press’n Seal
easier to remove like perforated paper). With utility thread in your
machine (top & bobbin threads), stitch around your drawings. Cut threads
between letters. Be sure to stitch around the inside circle of the ‘O’s as
well.

- When you've done all this initial stitching, pull away all the Glad Press’n Seal. You don’t need it any more. If some little bits
are left behind, they’ll be covered up by the decorative stitching in the next step.

Removing plastic wrap - I chose to use a zigzag stitch with my open applique foot to finish the edges. I set the default width of the stitch smaller. You may need to adjust the length of the stitch as well so that it is close. I also selected to have auto-knot & -snip for any time I completed the stitching on a letter. My applique foot has a center mark that I could use to aim my stitching as I sewed around all edges. I paid attention to corners of the letters to make sure they were covered with thread as well.
 |
| Zigzag stitching |
 |
| Zigzag stitching complete |
Finish Work:
- Use pinking shears or other edge trimmers for
cutting out the letters, being careful not to decorative stitching. If you do
snip some of the stitching, go back over it in those spots.

Snip close to stitching, but don't clip stitching! - Snip any thread ends.
- Place on a background of your choice. This could be a ribbon, fabric, craft board in a vertical, horizontal or diagonal position. Decide how you’d like to adhere it to the surface and how it will hang once it’s put together. It could be stitched (by hand or machine), glued, Velcro-ed, etc. Decorate your garland or banner with ornaments, candies, ribbons, bells, buttons, tinsel, etc. Add some cheer to your walls, mantle, shelf, door, etc. Have fun!

I haven't finished mine, but here's my idea.
Finished size is at least 4" x 24".
**As a bonus, I'd like to have you email me if you make one yourself! I'd love to feature them on my blog. When you finish, take a good photo, and Google+ the photo to me, along with your name and/or blog name. I can't wait to see what you do!
No comments:
Post a Comment