Copyright Protection

Protected by Copyscape DMCA Takedown Notice Infringement Search Tool All content, including text and original photos are copyrighted and are property of the blog author, Julie Johnson

Thursday, December 19, 2013

Meet a Designer, Author, Teacher & Longarm Quilter!

Hey, I want you to meet my PT therapist assistant & fellow quilter/designer/etc. friend, Sheila Sinclair Snyder. We've actually been acquainted with one another since our kids were in elementary school, which is MANY years ago. "Thanks" to my impinged shoulder (GRRRRRRRRRRRRRR), I get to have one-on-one time with her for a little while. We mostly talk about how to improve my circumstances so I'll be able to avoid surgery & continue my inspired endeavors without significant interruption, BUT we also sneak in a little conversation about our families and arts.

See her kit for this very modern footstool as well as a smaller version in a pincushion: LicenseToQuilt.com & Connecting Threads

I've run into her a time or two at local quilt shows and quilt shops, & I've been able to enjoy a couple of her previous books, Pieced to Fit and Perfect Fit Pieced Borders. She has a new one out: Get Addicted to Free-Motion Quilting, Go from Simple to Sensational. She's available as a teacher and lecturer.


Here's the link to her website where you can also find some free downloadable patterns to enjoy: LicenseToQuilt.com

Make sure you take the time to get better acquainted with her, just like I'm doing! I think you'll be glad you did.

Wednesday, December 18, 2013

A Tag Exchange: What's that?!


 WIP Wednesday at Freshly Pieced


For "Works in Progress" Wednesday, I finally found a little something to share with you.    


I'm part of an online exchange group with other creative people who inspire me (like you)! So, in spite of the busy-ness of this holiday season, I made a commitment to prepare something "creative" to share with someone I don't know which I'm working on today. The only specifics for this exchange are that the tag needs to be made from cloth (simple!), and have a hole for hanging. No particular theme, so anything goes.
Tag front: a paper-pieced house (made a couple of years ago) combined with a block of words embroidered on my machine that mean house in 3 languages, Spanish, English, and Japanese.

Tag back: strip pieced block that I'd done several years ago. I might add some lace trim I made even more YEARS ago along the seams of these strips.
I stuffed it with fluffy batting and added some lavender to the inside to give it a gentle scent. Maybe I'll find a button or two for further embellishment!

Have a wonderful, safe & joyful holiday!

Thursday, December 12, 2013

WestJet Christmas Miracle: real-time giving


I want to share some holiday creativity with you! Creativity is what we're about here, so I hope this inspires you. My dad used to read this story to my sister and I ("Twas the Night Before Christmas") every year the night before Christmas around the tree. This is a nice adaptation of an old sweet story, and the spirit of giving. Cheers!

Tuesday, December 10, 2013

Snow & "WIP" Wednesday: Fish Handbag Next?


It's probably not news to anyone, but SNOW hit our area last Friday. This truly had to be a blast from the Arctic--we've been BELOW freezing for several days now! Very unusual for this part of Oregon. I've never experienced a truly powdery snow like this, so light to hold or shovel (until it melts & freezes underneath)--our snows are usually sopping wet when we get them. I guess that's what happens when the temp is in the single digits!!

Norm, the chicken herder


Our poor chick-girls remained "cooped-up" for days, fearing to tread in this white stuff, which happened to be freezing to walk on as well! So my dear husband tried to coax them out yesterday to cluck along the shoveled path in the brilliant sunshine. They weren't real happy about it.


WIP Wednesday at Freshly Pieced
I've done some sewing & dreaming while keeping warm in the house. I've collected some fabrics (just like you). I dream about making these particular fabrics into a handbag, like the "Chicken Bag" I featured on Nov. 18, 2013. I'll make some modifications to the pockets, the top and the arrangement of fabrics. Please don't think I only like chickens. I like fish, too! I can't wait!

It's hard to see the gray and whites, but they're lovely!

Tuesday, December 3, 2013

"WIP" Wednesday: Red & White Table Runner to be Re-Quilted

Do you ever have times like this: you've already "finished" the project, but you're not satisfied? That's what I'm dealing with in this table runner: I'm not happy with my machine quilting, so I "un-sewed" and will do something different. I'm convinced I'll like it better.
Top: Bright, isn't it?

Back
Sometimes I can't leave "well-enough" alone. 


Tell me about a something that you technically "finished," but decided to take apart to bring it more in line with your expectations.

WIP Wednesday at Freshly Pieced

Saturday, November 30, 2013

Ho-Ho-Ho Garland Finished

You may remember my former posts, on Nov. 19 when I exhibit the results of drinking a mocha & visiting a shop of STUFF and begin making a banner or garland for the holidays. On Nov. 21, I posted a tutorial on how to make the fabric letters. Yesterday, the day after a wonderful Thanksgiving meal and conversation with our daughter and friends, we watched a university football game fraught with rivalry (the University of Oregon "Ducks", our family's team, versus the Oregon State University "Beavers", my sister's family's team). The incredible game kept us on the edge of our seats till the very end, when our team won in the final seconds, 36-35!!! What's this got to do with the garland?, you may ask. My dear husband set up a card table so I could finish its design and bring this fun project to completion so it could be hung on our front door before Christmas. I spread all the ingredients I'd collected on the table including scissors, wire cutters (for the canvas ribbon used as the base), thread, needles and pins.

 I love the result!
 Now when we open the front door, it's fun to hear the tinkle of the 4 green and red bells.
Bells, fake holly & berries, ribbons, and ornaments.

I found this cute Santa at a thrift store & gave him a new home.
If you make something like this, please share it. 
I enjoy seeing what others create!

Tuesday, November 26, 2013

Christmas Tree Skirt (reversible) almost finished! and Thanksgiving Prep

Patchwork & quilted tree skirt with ties, reversible.
grab a button
My work in progress: I started this tree skirt before Christmas last year. Apparently I created my own layout since I didn't place the parts of the stars in the right positions. Oh well! I am so happy to finally have the binding and ties attached. The ties are black (made from a small Christmas print) to match the back side, which I also chose to design. I finished hand-stitching the binding to the back this evening after a long day of Thanksgiving meal prep. I want to add some machine quilting to the larger spaces now that I have a new machine (purchased after I'd put this together and did the initial quilting on my old, very old machine)! I'm so glad this will be done for our tree this year! How cheerful and homespun it will look.
Close up of what was supposed to be a star :P


****Don't forget to check out my recent interview of 2 designers featured on my previous blog page!****


I spent most of the day cooking the following:
Roasted & flavored pecans & walnuts
Homemade stock for gravy making


Photo
Homemade chocolate fudge

For those of you in the U.S., I hope you have a wonderful Thanksgiving Day celebration!

Monday, November 25, 2013

Meet 2 Pattern Designers: Sisters Barbara & Ann

I attended a "trunk show" for 2 sister designers at a favorite local quilt and fabric shop on Saturday, Piece by PieceBarbara and Ann graciously allowed me to take some pictures, inadequate though they are, so that you can become acquainted, too! Their patterns are reasonably priced, creative, and perfect for gifts!

Vanilla House Designs

Meet Barbara Brunson whose whimsical and delightful patterns will help to make your environment sparkle!
Barbara modeling one of her apron designs.
She's been designing for 20 years!! I think it's time you checked out her blog: vanillahousetoday.blogspot.com , and her website: VanillaHouseDesigns.com. (Click on the titles.) 

Her dynamic display included: aprons (women, men, children--for every task, not just cooking!), cooking mitts, Christmas stockings, doll clothes, soft sculptures (useful in the sewing room!), table runners, portable ironing boards, bibs, pocket hanger, SATCHELS, home dec, and so much more!
My photo is an inadequate representation.
Check out her chic apron design that challenges symmetrical quilters and sewists: Off Sides (#P167). There's also the bling jewelry.

Olive Ann Designs

Notice her sample dresses featured with her patterns.
Meet Ann Blair who makes patterns for girls' clothes that will definitely highlight their vivacity, as well as other handy items for moms (and grandmothers)! 


I'm partial to the new Michael Miller chicken fabric
used in this "Classy Cargo" pattern (#OAD84)!


"Easy Peazy Pleats" pattern (#OAD83)


What inspired her to pursue this endeavor two years ago? It's a common refrain: she wanted to make cute clothes for her granddaughters, and the patterns available didn't fit! That's always disappointing! You're in for a treat when you go to OliveAnnDesigns.com (click on it) and see what she's got for you: dresses, tops, shorts, doll clothes, slings, duvet covers, crib comforters & rugs, changing mats, burp cloths, leggings, nursing shawls, baby hats, diaper covers, adult & child totes, and offers custom orders!


Check out her patterns with the giraffe appliques--very cute!! Yeah Ann!

Let me know what you think, & thanks for stopping by!


Friday, November 22, 2013

Newly listed on Etsy: Handmade Black & White Quilted "Picket Fence" Table Runner

I like this design because the stars really shine in the 3 sections, especially when using fabrics with high contrast. It's difficult to photograph so that it doesn't look washed out (or like blah black & white photos). In person, it's bright!


I chose a charm pack from a quilt shop featuring black and white fabrics with bits of yellow/gold here and there (see posting on Nov. 15, though those fabrics are the leftovers). I had to augmented the group with a few others. Then I needed fabric for the back and binding (an excuse to go to the quilt shop, yeah!). I machine quilted with a 1/4" outline in white cotton thread.

back view
I look forward to making more of this pattern in the future, and like I said, I hope to publish the pattern, too! Let me know if you're interested. I'll notify you when its done :)

Thursday, November 21, 2013

HOW TO MAKE “HO HO HO” GARLAND or BANNER: A tutorial **

Dress up your holiday!
Skill level: Easy!
Supplies:
  •          (2) ¼ yd. or more fabrics of choice, 1 for back, 1 for top (if you want the letters to be reversible, think about this!)
  •          Lofty acrylic batting/wadding
  •          Temporary Spray Adhesive (I used Sulky KK2000)
  •          Glad Press’n Seal
  •          Sharp Pinking or other fancy edge scissors or rotary cutter
  •          Paper cutting scissors or craft razor blade
  •          Paper
  •          Pencil
  •          Marking Pen (to mark on Glad Press’n Seal)
  •          Utility thread
  •          Decorative thread in top & bobbin
  •          Other decorative items of your choice: ribbon, candy canes (real or fake), ornaments, tinsel, etc.
  •          Something by which to hang the letters, eg, O-ring, fabric, craft board, etc.

Making the stencils:

    1. .       Draw your letters to make stencils—I did mine freehand (the 'H' measures about 4"x5"; the 'O' measures about 3"x3").  You could also use the computer for choosing fonts: select a font that will give you a block style from which to make a stencil and print. Cut out with craft scissors or razor blade. (If you’re really confident, skip this step and go to step 2 directly.)

      2.       Place your cut-outs (or do your freehand) on a piece of cardboard or template plastic. Draw around the stencil with a pencil or pen. Cut out with craft scissors or razor blade.
                  
Making the "fabric sandwich":
  1. If you’ll be using the adhesive spray product, I recommend that you do it in the lid of a cardboard box, or take it outside so that any overspray will not affect other surfaces or cause problems with fumes. I used a box lid.
  2. On your chosen surface, place and smooth out the backing fabric wrong-side up. Spritz with adhesive quickly across the fabric or in bursts—not necessary to use much, so watch your trigger finger.
  3. Place and smooth out the batting/wadding on top of sprayed wrong-side of backing fabric. (I used a raggy scrap of batting.)
  4. Place top fabric wrong-side up on top of the batting, smooth out and spritz. Turn over and place on top of batting. Take out of box, or return inside and smooth out.
  5. Pull out a small sheet of Glad Press’n Seal that will cover the fabric surface that you will be stenciling. Note that the Glad Press’n Seal is bumpy and sticky on one side (easy-to-remove sticky). Place this on the surface of the fabric and smooth out with your hands. 
    Product placement?? (LOL)
Stenciling Fabric and Stitching:
  1. Place your stencils on top of the “fabric sandwich” you just created. Leave at least ½” or more between letters as you will be leaving a ragged but decorative edge when you cut them out. (Stencils should be on top of the Glad Press’n Seal.) Using a marker, draw around your letters. Don’t be too fussy. They’re supposed to looked folksy or homemade.
    Tracing the letters onto plastic wrap.
  2. Set your straight stitch length to about “2” for closer stitches (makes the Glad Press’n Seal easier to remove like perforated paper). With utility thread in your machine (top & bobbin threads), stitch around your drawings. Cut threads between letters. Be sure to stitch around the inside circle of the ‘O’s as well.
  3. When you've done all this initial stitching, pull away all the Glad Press’n Seal. You don’t need it any more. If some little bits are left behind, they’ll be covered up by the decorative stitching in the next step.
    Removing plastic wrap
  4.  I chose to use a zigzag stitch with my open applique foot to finish the edges. I set the default width of the stitch smaller. You may need to adjust the length of the stitch as well so that it is close. I also selected to have auto-knot & -snip for any time I completed the stitching on a letter. My applique foot has a center mark that I could use to aim my stitching as I sewed around all edges. I paid attention to corners of the letters to make sure they were covered with thread as well.
Zigzag stitching
Zigzag stitching complete
Finish Work:
  1. Use pinking shears or other edge trimmers for cutting out the letters, being careful not to decorative stitching. If you do snip some of the stitching, go back over it in those spots.
    Snip close to stitching, but don't clip stitching!

  2. Snip any thread ends.
  3. Place on a background of your choice. This could be a ribbon, fabric, craft board in a vertical, horizontal or diagonal position. Decide how you’d like to adhere it to the surface and how it will hang once it’s put together. It could be stitched (by hand or machine), glued, Velcro-ed, etc. Decorate your garland or banner with ornaments, candies, ribbons, bells, buttons, tinsel, etc. Add some cheer to your walls, mantle, shelf, door, etc. Have fun!
    I haven't finished mine, but here's my idea.
    Finished size is at least 4" x 24".

    **As a bonus, I'd like to have you email me if you make one yourself! I'd love to feature them on my blog. When you finish, take a good photo, and Google+ the photo to me, along with your name and/or blog name. I can't wait to see what you do!

Tuesday, November 19, 2013

A stop at a local shop bursting with stimulation & inspiration, add an iced coffee mocha and... 

the Rest is History…

There’s a small shop in town that specializes in cramming every bit of its space with (new) STUFF. I used to enjoy going into this store while attending university. In fact, this type of small shop reminds me of browsing and shopping in Japan. I loved it! Real estate is very expensive in Japan, so making a space, however small, profitable is important. In fact, many of the shops are truly storefronts with their small personal living space behind a curtain at the back. It’s not unusual to find the shopkeeper watching tv, cooking for the family or doing other household tasks when I came by. I would peruse the space like a detective so I wouldn’t miss any nook or cranny. I had a fascination with all the items, some unfamiliar and curious. In any case, it’d been a long time since I’d stopped at this local shop, so after “visiting” the dentist (argh!) and being on that end of town, I decided to “reward” myself (ever do this??) and venture in, just for a little look. An hour later…

After returning home and eating lunch, I enjoyed an iced mocha at 2pm. I make it a habit, for my health, to take a daily rest, usually by 2pm but I didn't get to it early enough today. As I shut my eyes, it swiftly became apparent that actual sleep wouldn't be happening, no matter how long I lay there. Images flooded my head. My mind took flights of fancy, envisioning sewing and art endeavors that put a smile on my face. Excitement increased as each image and idea fled by, and I knew I was swamped…wrong beverage to drink at 2pm! So I gave up.

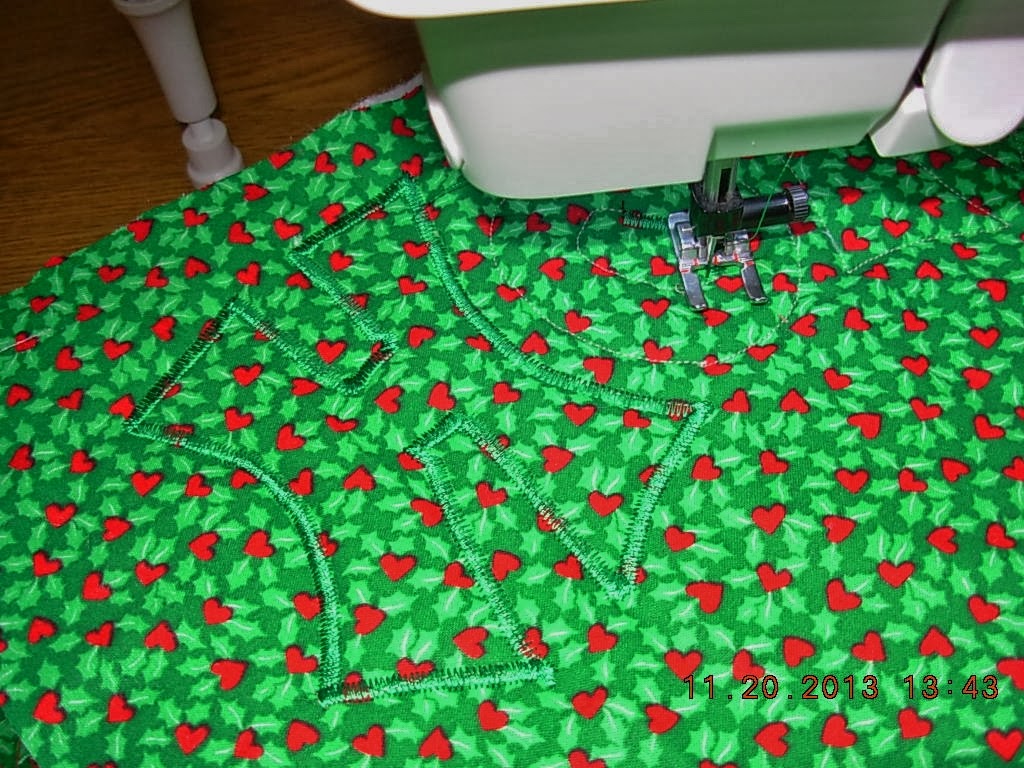
This is one idea I had today, and I will designate it as my project for "Works in Progress" Wednesday:

A seasonal banner

Close-up
I envision this little banner to be capable of hanging on a wall, a mantle, a shelf…wherever someone wants to add holiday cheer! 
So I’m still working out the details. 
What flights of fancy have come to you lately?
WIP Wednesday at Freshly Pieced

Debut: Reversible Black & White Picket Fence* Table Runner

I gave a sneak peak of the fabrics for this project on Nov. 15th. 
When those fabrics (blacks, grays, whites, & little bits of yellow/gold) played together, this is what happened:

Top View

Notice the Japanese kanji fabric? I think it says "ninja."
It might looked "washed out" since the fabrics are black, white, gray, but in person they're sharp.

Back View
I chose a fabric with a plaid design for the binding, which is more gray than black. I thought the yellow/gold would help draw out the yellow/gold in the top. The splash of floral on the back makes a contrasting statement to the geometric-type of fabrics and layout that dominate the top. All that's left is hand-stitching the binding to the back, then watch for its appearance on Etsy!

*I mentioned in my Nov. 12 blog post my plan to publish a tutorial and/or pattern of this "picket fence" design. If you'd be interested, please let me know so I can notify you when it's done.

Monday, November 18, 2013

Chick Bag Complete!


Ta Da!
I am happy to announce that I have finished the hens & chick fabrics handbag, & enjoyed using it yesterday, even though it "didn't match my outfit," LOL. I only needed to make and add the handles to finish the project from several months ago. Isn't that the way it goes sometimes? It's very roomy inside, keeps its shape thanks to thick interfacing, & has many pockets. I added pockets to the inside as well as to each side of the outside. Can never have too many organizing pockets & pouches! I want to be forthcoming in admitting to you all that it's the fabrics, featuring my favorite "pets" (who produce eggs & entertainment as a bonus), that inspired this handbag. 

Here's what my real chick, "Dickens", looked like as a hatch-ling:
Ain't she sweet?!
Seeing she and her brothers hatched by mother "Skitters" became a very special memory that we were able to record with a camcorder (we couldn't see them crack out of the egg, but we did get to marvel at their first few days of taking a peek at the world from under the warm feathers of their mother). We couldn't keep her noisy & aggressive but BEAUTIFUL brothers as they came into their own at 3 months, so she is special (and the original intent: more egg-laying hens). Speaking of "Running Hen", she is the inspiration for the title of my blog.